
An animated background video is a looping MP4 with no text or UI — pure motion, built to sit behind content. Below is a 20-second example made with Claude Design and exported with Claude2Video.
What It's For
A clean animated background is a layer, not content. Overlay text, a logo, or a product shot and it reads as intentional design rather than a generated asset. The most common uses:
- YouTube intro / outro — 3–5 seconds of motion before your title card
- Social media Reel background — text-on-video performs better than text-on-static in most feeds
- Presentation title slide — drop it into Keynote or PowerPoint as a video background
- Product launch ambient loop — play silently behind a hero section or a countdown page
- Brand sizzle reel opener — sets tone before the product footage starts
How It Was Made
Three steps. No motion design experience needed.
-
Gather reference images. Claude Design reads visual references and mirrors their color, texture, and energy — without them, the output trends toward generic. For this video, two images defined the aesthetic:
 Reference 1: fluid ribbon composition, saturated neon palette.
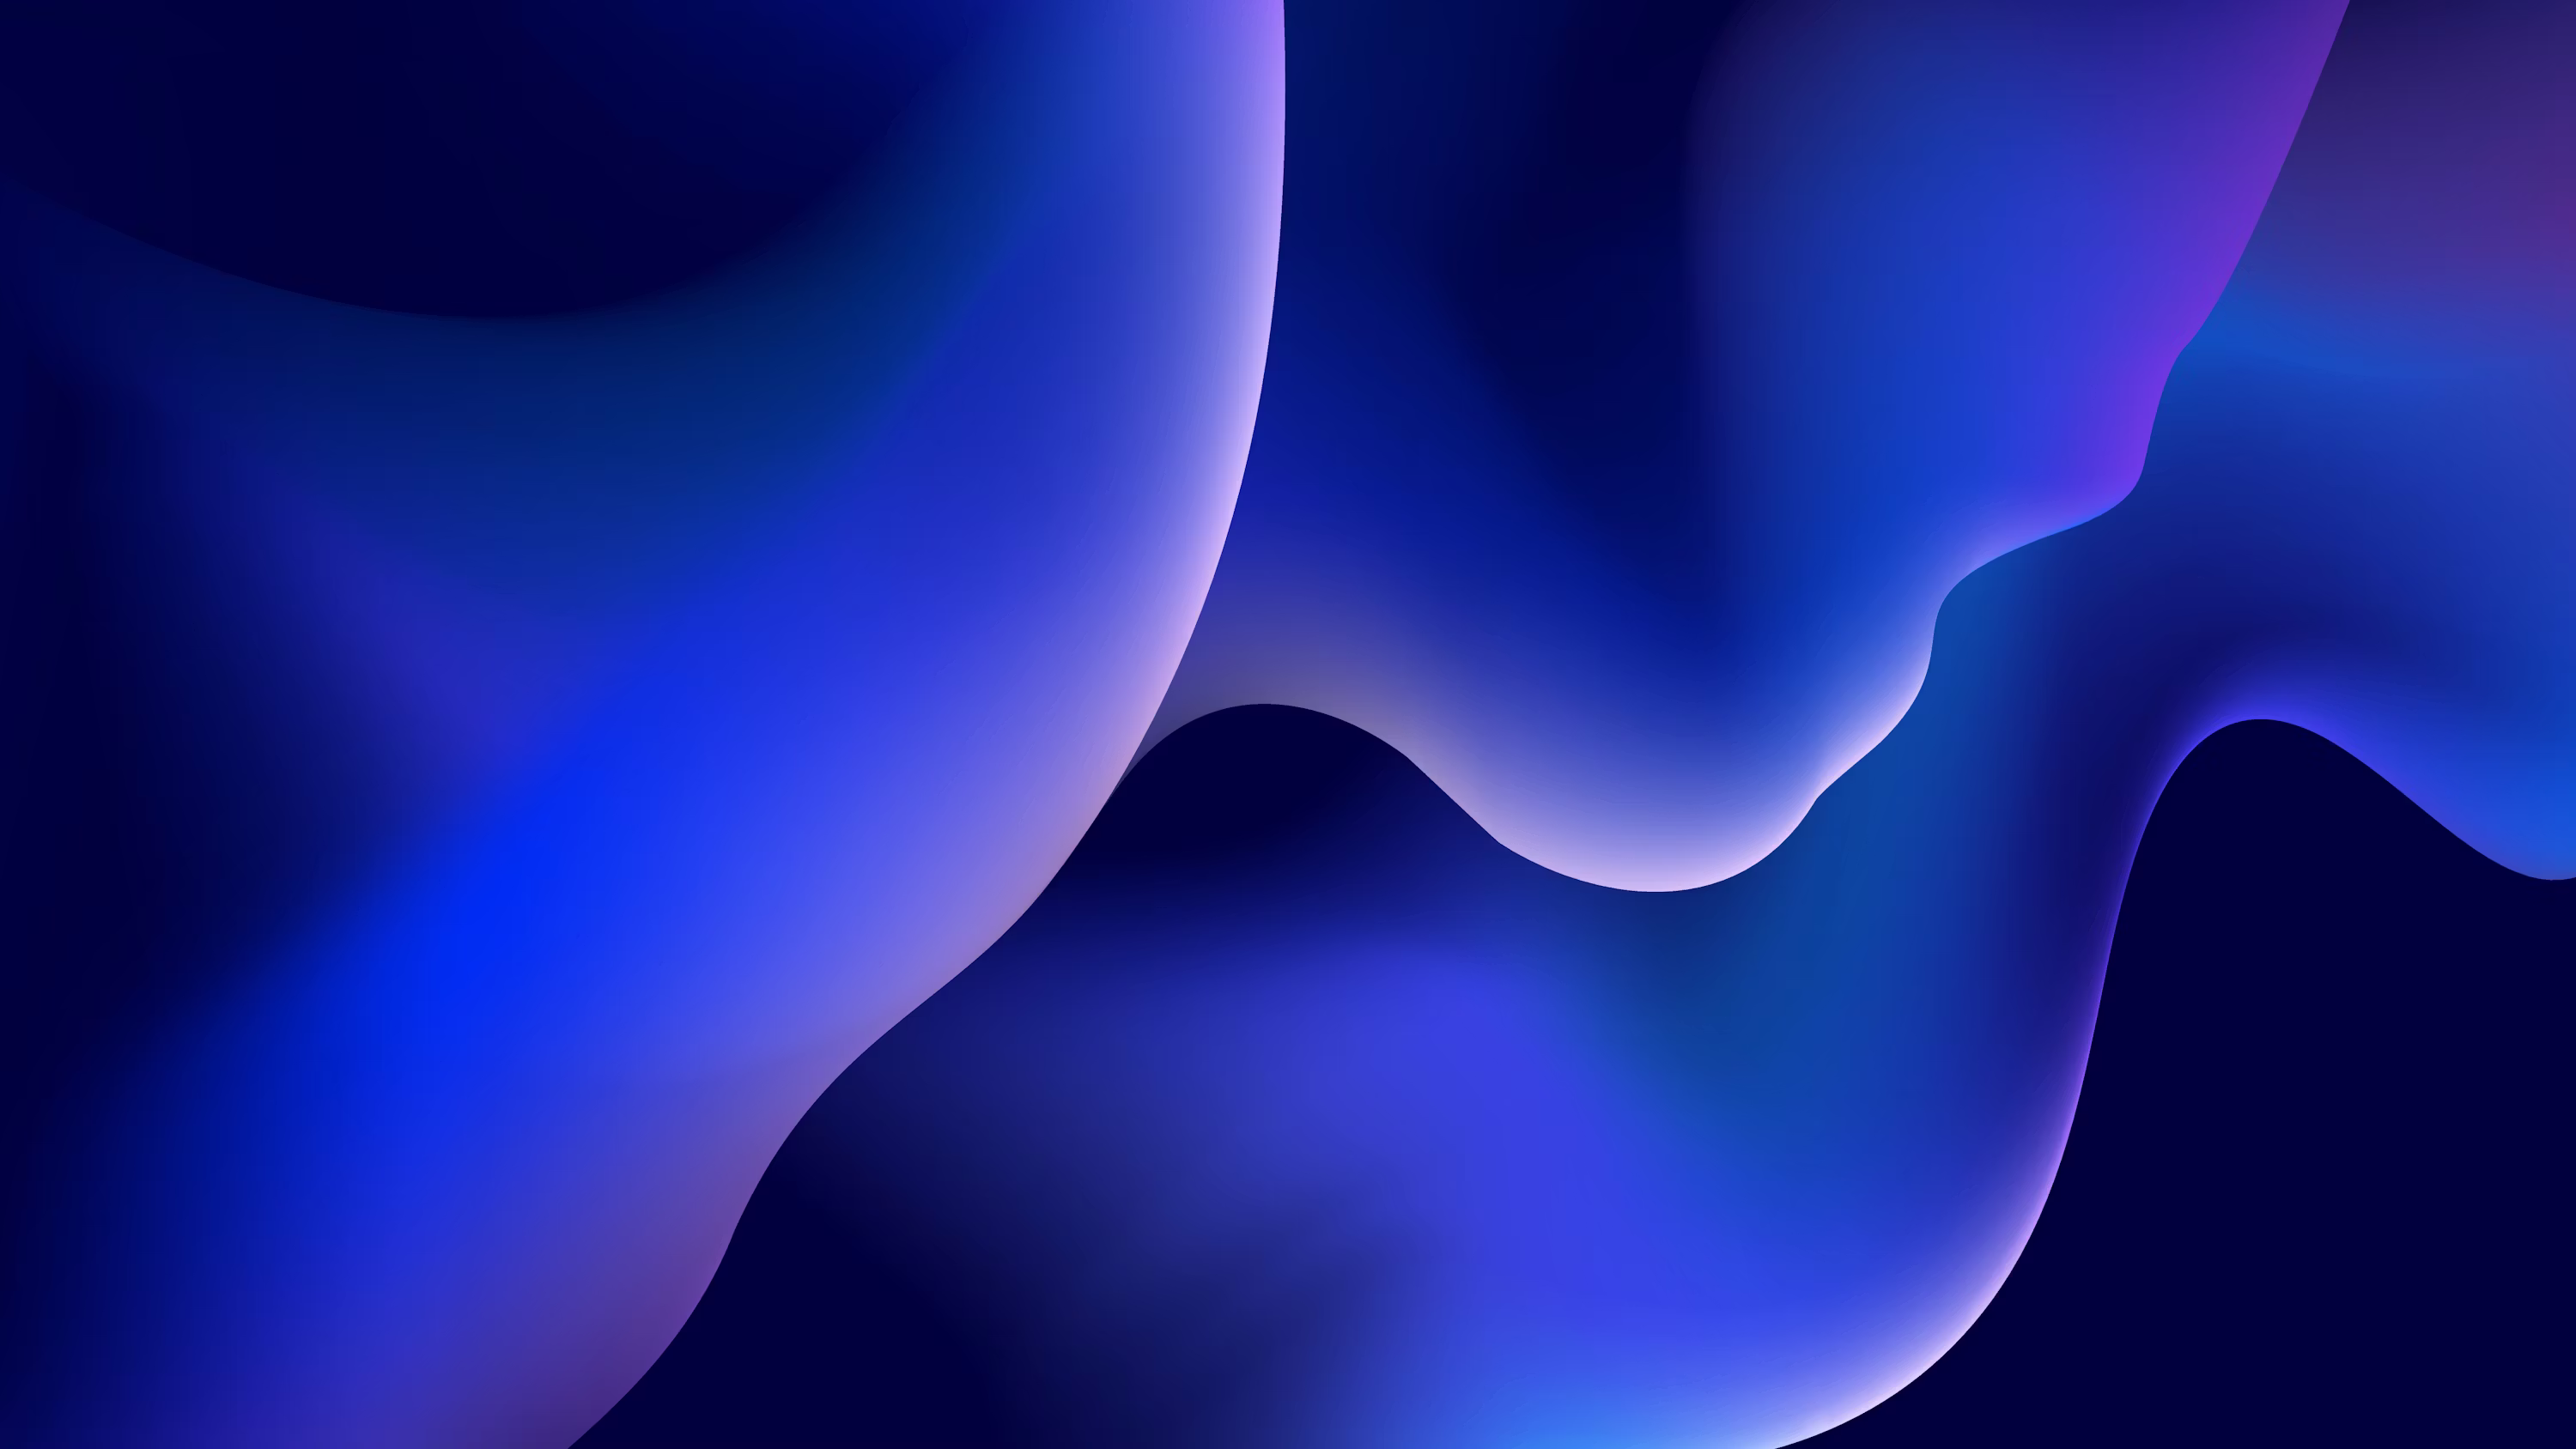 Reference 2: cooler hues, gloss and depth.
Upload both images into Claude Design before pasting the prompt. Claude Design accepts image attachments directly in the chat.
-
Paste the background prompt into Claude Design. This prompt defines the geometry, animation math, and color palette precisely enough that Claude Design reliably produces a seamless loop:
Build a 20-second looping abstract background video in HTML — Apple-style fluid wallpaper. 1920×1080, autoplay, seamless loop.

ARCHITECTURE

React + Babel inline (no build step). Three files:
- Ribbon Wallpaper.html — pinned React 18.3.1 + Babel standalone 7.29.0
- animations.jsx — small engine exporting <Stage width height duration background loop autoplay>, useTime(), useTimeline(). Stage runs a requestAnimationFrame loop and provides a TimelineContext.
- scene.jsx — the <RibbonScene> component, rendered as a child of <Stage>

VISUAL

5 horizontal "ribbon" bands fully cover the canvas vertically. Adjacent ribbons share edges (no gap between them ever).

Each ribbon is a single SVG <path> with crisp edges (no blur, no mix-blend-mode). Each ribbon is filled with its own vertical <linearGradient> with EXACTLY 4 stops at offsets 0, 0.35, 0.72, 1.0 (no bright midline). Use gradientUnits="objectBoundingBox".

Neon / electric palette, top ribbon to bottom ribbon:
- Peach #FFD3A8 → orange #FF8B3D → red #FF3D29 → crimson #C9112A
- Pink #FF6FB1 → magenta #FF2EA0 → violet #B81CC4 → deep violet #4A1592
- Light violet #C5A8FF → indigo #6E55FF → blue #2B2EE6 → deep blue #0E1A8C
- Sky #8FDDFF → blue #1E96FF → cyan #06C6E8 → teal #04D9C8
- Lime #D2FF6E → green #4DFF6B → emerald #16D766 → deep emerald #078A4B

Scene background #0a0612.

GEOMETRY

Define 6 "edge" curves. Ribbon i is the closed fill between edge i (top) and edge i+1 (bottom). Edges (baseY is fraction of H, amp is fraction of H):

  edge 0: baseY -0.15, amp 0.035, period 1.6, phase 0.00
  edge 1: baseY  0.20, amp 0.050, period 1.6, phase 0.18
  edge 2: baseY  0.40, amp 0.055, period 1.6, phase 0.36
  edge 3: baseY  0.60, amp 0.055, period 1.6, phase 0.54
  edge 4: baseY  0.80, amp 0.050, period 1.6, phase 0.72
  edge 5: baseY  1.15, amp 0.035, period 1.6, phase 0.90

period 1.6 means less than one wavelength fits across the canvas — long, lazy curves. Top and bottom edges extend past the viewport (-0.15 and 1.15) so corners stay covered under camera motion. Phases are spread evenly so ribbons pinch and expand along their length.

Sample 56 POINTS PER EDGE, connect with cubic-bezier (Catmull-Rom) smoothing using cp1 = p1 + (p2-p0)/6, cp2 = p2 - (p3-p1)/6. Both ribbons sharing an edge must reuse the SAME sample array — Catmull-Rom is direction-reversible, so the shared curve is bit-identical and seams are gap-free.

EDGE EQUATION — t ∈ [0,1] is the loop position, x ∈ [0,1] is normalized horizontal:

  omega       = TAU / edge.period
  phaseT      = 3·TAU·t + TAU·edge.phase
  ampBreath   = 1 + 0.15·sin(TAU·t + TAU·edge.phase)
  drift       = 0.02·sin(TAU·t + 2·TAU·edge.phase)
  a           = edge.amp · ampBreath

  y(x,t) = edge.baseY + drift
         + a · sin(omega·x + phaseT)
         + a · 0.40 · sin(1.7·omega·x + 4·TAU·t + TAU·edge.phase + 0.7)
         + a · 0.22 · sin(2.3·omega·x + 6·TAU·t + TAU·edge.phase + 1.3)

Every sin/cos's TIME multiplier must be an integer × TAU·t (here: 1, 2, 3, 4, 6) — otherwise the loop will jump at t=1.

CAMERA TRANSFORM (applied to the whole SVG via CSS transform from center, all integer harmonics):

  rot   = sin(TAU·t)·22  + sin(2·TAU·t + 1.7)·4    degrees
  scale = 1.65 + sin(2·TAU·t + 0.8)·0.22 + sin(TAU·t + 2.4)·0.06
  tx    = (cos(TAU·t)·5  + sin(2·TAU·t + 0.5)·2) % of W
  ty    = (sin(TAU·t + 1.1)·4 + cos(2·TAU·t)·2)  % of H

SVG itself uses overflow="visible"; the outer container clips at 1920×1080.

RENDER ORDER

Render ribbons BOTTOM-UP (r4, r3, r2, r1, r0) so each ribbon's drop-shadow falls onto the already-painted ribbon below.

POLISH

- Drop shadow on each ribbon via shared SVG <filter> with <feDropShadow dx="0" dy="14" stdDeviation="10" flood-opacity="0.35" flood-color="#000">.
- Radial vignette overlay (div): radial-gradient(ellipse 70% 70% at 50% 50%, rgba(0,0,0,0) 35%, rgba(0,0,0,0.55) 100%).
- Grain overlay: a separate SVG with <feTurbulence type="fractalNoise" baseFrequency="0.9" numOctaves="2" stitchTiles="stitch"> desaturated, opacity: 0.07, mix-blend-mode: overlay.

Result: long lazy curves with quick organic wobble, a slow rotating/zooming camera, all looping cleanly at 20s.
The key ideas: six sine-wave edges define five ribbon bands between them. Every animation argument uses an integer multiple of
TAU·tso the 20-second loop closes without a jump. The camera transform (rotation, scale, translation) adds the fluid, alive feeling — without it, the ribbons look mechanical. -
Export with Claude2Video. Click Share in Claude Design, copy the URL, paste it into Claude2Video, and download the MP4. Background loops don't need voiceover or music — just the raw video file.
Adjusting the Style
The prompt is a template. Three things you can change without breaking the loop math:
- Swap the palette — replace the five color descriptions (e.g. "deep navy → electric teal → seafoam" for a cooler brand) while keeping the gradient structure intact
- Change the ribbon count — 3 ribbons for a bold, graphic look; 7 for something finer and more textile-like (adjust edge count to ribbon count + 1)
- Replace the reference images — dark editorial photography shifts the output toward moodier darks; light pastel illustrations pull it toward soft gradients
Frequently Asked Questions
Does Claude Design produce seamless loops?
Not automatically. The prompt above forces it by constraining every animation argument to integer multiples of TAU·t over a 20-second period — which guarantees the first and last frames are identical. Without that constraint, Claude Design's default animations usually drift and jump at the loop point.
Can I put text or a logo over this background in the final video? Yes, but do it after export. Drop the MP4 into CapCut, DaVinci Resolve, or even Canva as a background track, then add your text layer on top. Trying to build the text into the Claude Design animation adds prompt complexity and usually breaks the loop math.
What's the difference between a Claude Design background video and a stock motion background? Stock motion backgrounds are generic by definition — the same loops appear in thousands of videos. This one takes 10 minutes, is parameterized by your palette, and doesn't exist anywhere else. Swap the reference images and you get a completely different result. For a deeper dive into the workflow, see the animated product demo walkthrough.